Sometimes everyday baking beats indulgence.

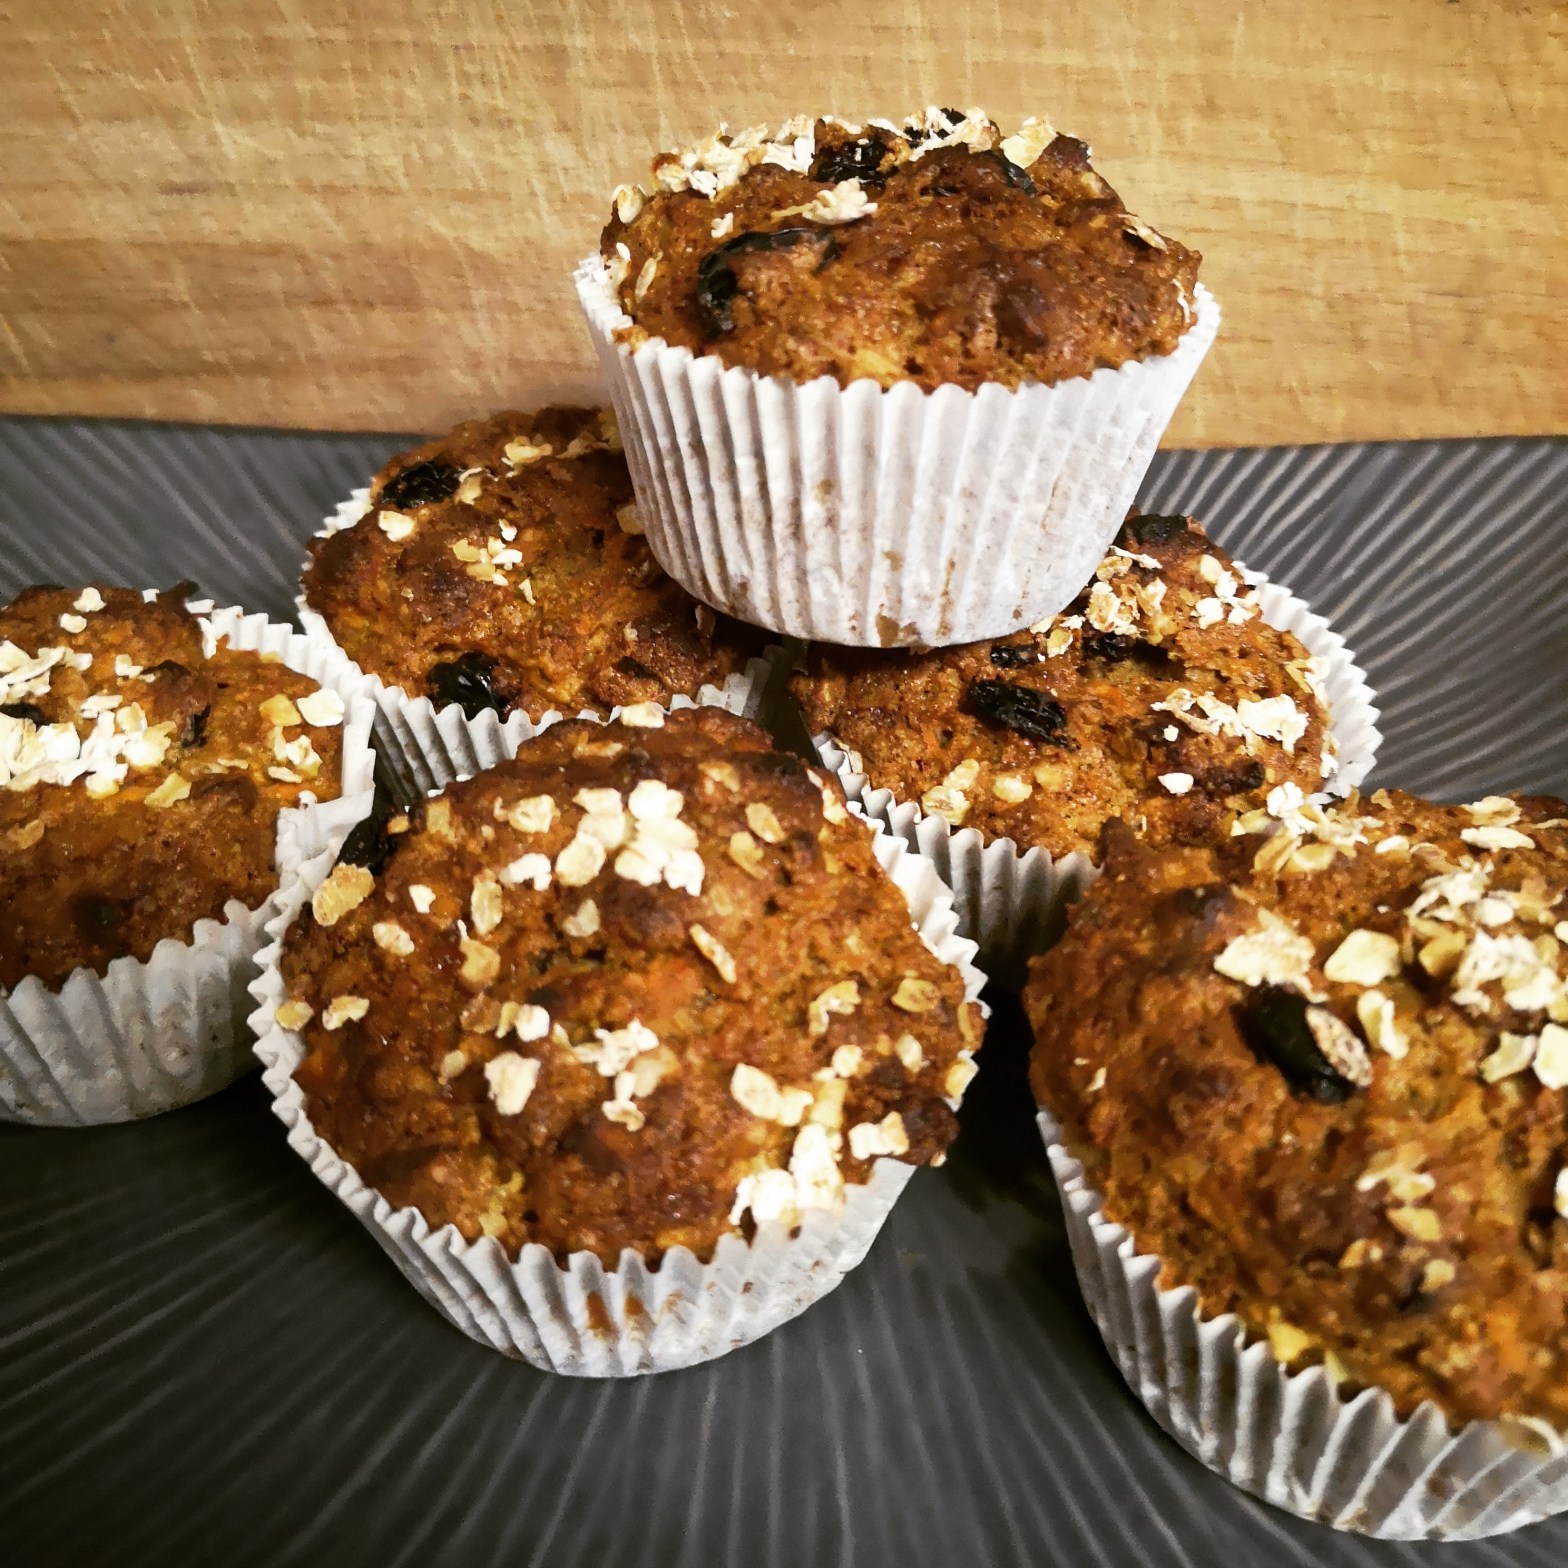
Sometimes it’s the the little bakes that take you by surprise. Those moments when you weren’t expecting to be in the kitchen and the item that someone has asked you to bake doesn’t initially fill you with much excitement. That’s what happened to me last week when my partner asked me to make some carrot and winter spiced breakfast muffins. I never say no to a chance of baking but have to say that this wasn’t a recipe that that I would have put on the ‘to bake’ list. 

Left to my own devices I know that I’m prone to always looking for the slightly indulgent bakes when I’m hunting through recipes. Those bakes that have a hint of special occasion about them.  These muffins were a welcome reminder that everyday baking can be just as rewarding and in it’s own way produce just as delicious results. The mix of the spices with the flavours of carrot, sultanas and orange is delicious. They’re filling without being remotely stodgy and work just as well with a cup of coffee in the evening as they do in lunch boxes or at breakfast.

Don’t be put off by the lengthy list of ingredients as the method is very straight forward. As with most muffin recipes virtually all ingredients could be swapped with alternatives that you might have in your pantry. The recipe makes 12 muffins

Ingredients

  • 75g sultanas
  • 100g white spelt flour
  • 100g wholegrain spelt flour
  • 2tsp baking powder
  • 1tsp bicarbonate of soda
  • 50g porridge oats
  • 150g light soft brown sugar
  • 2tsp ground cinnamon
  • 1tsp ground ginger
  • A grating of nutmeg
  • 90ml vegetable oil
  • 50g plain yoghurt
  • 2 eggs
  • 200g carrots, peeled and grated
  • Grated zest of an orange

Method

  • Preheat the oven to gas mark 6
  • Line a muffin tin with muffin cases
  • Soak the sultanas in boiling water for 5 minutes to plump them up. Drain and leave on a plate lined with kitchen paper.
  • Add the flours, baking powder, bicarb and oats to a large bowl. Fold in the sugar, cinnamon, ginger and nutmeg.
  • In another bowl whisk the oil and yoghurt together. Add the eggs and whisk again. 
  • Fold the wet mixture into the flour mix. Then fold in the carrot, orange zest and sultanas.
  • Divide the mixture between the 12 muffin cases. 
  • Sprinkle a few more oats on top and bake for 20 minutes.

I made my first pizza.

I made my first pizza recently. I’m not quite sure why I hadn’t beforehand but when pizza popped up as the #TwitterBakeAlong challenge a couple of weeks ago I decided it was time to have a go. Now I’m left wondering why it took me so long to get round to it and how quickly can I have another go.

I’ve always loved pizza but somehow it’s felt like one of those foods that better eaten in a restaurant than at home. Some of my earliest memories of going to restaurants with friends rather than with family are to pizza houses. Saving up the money from my weekend job stacking supermarket shelves and then going out for a Saturday evening treat. Probably with an underage drink or two as well.

My parents both loved Italy and for years we had family holidays there. The most memorable was when we drove back from Malta to the UK. This meant a ferry from Malta and then a leisurely ten days driving and camping across Sicily, then all the way up the length of Italy. There are many great memories but for me to this day the strongest are eating mussels for the first time in my life and finding that every camp site we stayed at had a bar with a pizza oven that was producing mouth watering food.

There was a time, and my Saturday evening treat memories are probably from then, when most of the pizzas that you got in the UK weren’t really very good. They were chain restaurants with thin, bland and unexciting offerings. Thankfully these days it’s very different, not only have the chains improved but there has been a huge boom in small independents The fact that they have managed to ride out the troubles that so many restaurants have been experiencing recently shows the eternal attraction of good pizza.  Brick Pizza here in Norwich is a prime example of the recent trend  and I would also have to mention Voodoo Ray’s in London. My partners son lives in Peckham and no trip to see him is complete without a Voodoo Ray’s pizza.

If my little ode to pizza has tempted you to have a go this is the recipe that I used to make the base. I’ll leave the toppings up to you but if you’re looking for suggestions I used tomatoes, mushrooms, olives, mozzarella and some herbs.

Ingredients for 2 large pizza bases

  • 500g strong white bread flour
  • 2tsp salt
  • 7g dried yeast.
  • 320ml lukewarm water

Method

  • Preheat the oven to gas mark 9
  • Combine the flour salt and yeast in a large bowl. Gradually add the water, mixing well with your hands to form a dough.
  • Shape the dough into a ball, cover with a cloth and leave to rest for 5 minutes.
  • Knead the dough for about 10 minutes then split it in half. Cover the two pieces of dough and leave to rise for about 30 minutes.
  • Spread some flour on your work surface and spread each piece of dough to about 30cm. Roll it as thin as you can but try to leave it slightly thicker at the edges.*
  • Add your topping and bake for approximately 10 minutes.

*I was worried about making them too thick but found that this dough allows you to roll it thin without tearing.

Pecan & white chocolate shortbread for tea.

There may have been a few things going on recently that have restricted the amount of time that I can devote to this blog, but what they haven’t done is restrict the amount of time that I get to spend in the kitchen. I’ve mentioned before that my partner and I are currently nursing her mother back to health after an illness and this has meant that for the last couple of months there have been three mouths to feed in the house, rather than the normal two. As my partner currently works full time three days a week it means that I’m looking after most of the cooking as well as the baking. I’m relishing the opportunities this gives me to delve into my cookbook collection and to try out new things. I did initially find it a little restrictive, as there are certain things that our invalid can’t have, but we’re working our way around that. Last week I got to make pizza’s for the first time and they were a great success. The beauty of that sort of dish is that the topping can be varied from plate to plate to take into account health requirements and how much heat or spice people prefer. Something tells me they might become a regular.

Although we do have to be a bit careful about the sugar contents I am finding that a sweet treat is always appreciated and I try to have something to hand. This morning I realised that we hadn’t got anything for this evening and after a quick scout of the pantry I decided on a batch of pecan and white chocolate shortbreads. When I’ve made these before it’s been with pistachios but we were out of those and pecans are a more that adequate alternative. To be honest these would probably work with just about any nuts that you might have available in your cupboards.

I’ve listed the ingredients to match the batch of nine that I made. Just amend accordingly if you want to make more.

  • 50g pecans
  • 100g unsalted butter
  • 50g caster sugar
  • 180g plain flour
  • 20g cornflour
  • 50g white chocolate, roughly chopped.
  • Preheat the oven to gas mark 3. Line a baking tray with parchment*
  • Roughly chop the pecans and toast them in a hot pan for a couple of minutes.
  • Rub the softened butter, sugar, flour and cornflour together. When the ingredients come together like breadcrumbs, add the toasted pecans and chopped chocolate. Continue to work the mixture together until it forms a dough.
  • Take tablespoon size pieces of the dough and mould them into balls. Press the balls of dough between your hands to form round shortbreads and place them on the tray with space between each one. Don’t worry if they’re not perfect rounds. These shortbreads are meant to look rustic.
  • When the tray is full place in the oven and bake for 20 minutes.
  • Remove the tray and allow the shortbreads to cool completely on the tray before you move them. This is important as they will be very crumbly when they first come out but will firm up as they cool.

* Rather than parchment you can use a baking mat .Someone bought me one for Christmas and if you’re a regular baker I thoroughly recommend them.

Sometimes you just need cake

Sometimes you just need cake. Maybe I should change that ‘you’ to ‘I’ but for this piece I’m going to assume that we all do. We all need cheering up and that’s never felt more relevant than on this dull and damp January afternoon. We’re now into that hibernation time of year when the holidays are over and unless you try quite hard it can feel difficult to get excited about very much over the next couple of months. I keep reading pieces about people giving up this to that for January but personally I can think of no time of year when I’d be less likely to want to make life any more difficult than it really needs to be. I know that we’ve all probably over indulged in recent weeks but as I said in my last post, sensible eating and portion control should be enough to take care of that. 

So to blow away the winter blues I’m going to continue baking at every opportunity and sharing what I make with you here.

The picture that accompanies this post is of my birthday cake from last week. Normally my partner would have baked it but as she’s currently spending much of her time helping her mother as she recovers from a stroke, the baking duties fell to me. What that meant was that I could make my favourite sponge and indulge in luxurious amounts of strawberries and cream. 

I had a very enjoyable and self indulgent birthday.

A little looking forward and a little looking back

In the spirit of this time of year lets do a little looking back and a little looking forward.

At the start of the year I was mid way through a creative writing course that I took through our local adult educational service here in Norwich. We were asked to set some goals at the outset and I listed one of mine as starting a food blog. In the last week of the course I posted my first piece and although the blog still feels like a work in progress, I’ll be very happy if I’m as successful with any targets that I set myself for next year.

Outside of the blog the other main food highlight of the year has simply been the chance to bake and cook more than I have ever done before. It’s now over twelve months since I left the world of office life and it’s opened up the opportunity to spend so much more time in the kitchen. For a long time I had ‘weekend baker’ listed in my Twitter profile but that’s had to come off now. The next step is going to be trying to extend the range of people I bake for. There’s only so much that immediate family can eat, probably only so much their waistbands can take, but there’s so much that I want to bake. I’m still trying to work out how to do it but finding an outlet so that i produce more is definitely the aim for 2020. Any suggestions would be appreciated.

Another aim for next year is to do some travelling. This year some of my favourite books would have been just as at home on the travel shelf as they would on the food one. The best of these was Felicity Cloake’s One More Croissant For the Road. A joyful account of her cycle trip around France that despite the title covers a lot more French culinary treats than just croissants. I was also hooked by Edward Lee’s Buttermilk Graffiti in which the author travels across the US sampling and writing about modern American food. Reading these books and also revelling in the recent BBC series that saw Rick Stein eat his was through France has fired the urge in me to venture further afield.

I know that this is the point in the calendar where we’re all supposed to make commitments to eat less or drink less , but at fear of sounding like a glutton I’m not about to do that. What I do want to do is eat better. I’ve mentioned in some previous posts that Natural Baking by Carolin Strothe was my favourite addition to the cookbook collection this year and it really has been quite a revelation to see how indulgent cakes can be even if the cream and sugar levels are reduced. Sensible cooking and portion control is my plan. With those in place there’s no reason why you can’t still be indulgent.

One final aim for next year is simply to keep enjoying new food experiences. I’m very lucky that Norwich has such a thriving food culture and although we’ve lost a few outlets in the last twelve months there have been a bunch of exciting new comers as well. My favourite find of 2019 is Aldente a wonderful Italian restaurant that I recommend to anyone with an evening to spare in Norwich.

So that just leaves me to say that whatever you’re looking forward to in 2020 I hope it happens and to wish you a Happy New Year.

Baking Advent Calendar day 23

When I started this Advent Calendar I hadn’t given much thought as to how it would pan out. There were some initial ideas about making all of the posts Christmas themed but I soon realised that I was setting myself up to fail if I went down that route. I like to think that the result has been a mixture of festive foods and other recipe options that you can dip into throughout the year. Tonight was never in doubt though. We’ve reached the final post and it has to be something for Christmas.

One obvious choice to have gone for would have been a traditional Christmas cake. That rich fruit cake, covered in icing, that is so synonymous with this time of year. The problem I would have had with baking and sharing one of those is that i don’t actually like them. I find that they often turn out too heavy, no one wants a slice on the day and you’re still wading through it weeks after the holiday is over. As an alternative I’ve opted for a clementine and almond cake with a streusel topping as my Christmas cake this year. It’s a recipe that I came across a few months back and straight away it said ‘special occasion’ to me.

Ingredients for the cake

  • 3 unwaxed clementines, unpeeled
  • 1 untaxed lemon, unpeeled
  • 4 tbsp demerara sugar
  • 6 eggs
  • 250g soft brown sugar
  • 250g ground almonds
  • 1 tsp baking powder
  • pinch of salt

Ingredients for the streusel topping

  • 25g plain flour
  • 15g rolled oats
  • 65g demerara  sugar
  • 50g cold unsalted butter, cubed
  • 25g pecan nuts

Method

  • Put the unpeeled clementines .and lemon a saucepan. Bring to the boil and then simmer for an hour.
  • While the fruit is simmering put all of the streusel ingredients in a food processor and blitz. Tip the streusel into a bowl and place it in the fridge.
  • Heat the oven to gas mark 6. Grease a 24cm cake tin and coat all of the sides with the demerara sugar.
  • Once the fruit has cooled scoop out the insides and discard the pips. Put the scooped out fruit into  a food processor and blitz to create a puree.
  • In a mixer beat the eggs and sugar until pale. Add the ground almonds, fruit puree, baking powder and salt. Beat again until light and smooth.
  • Pour the batter into the tin and top with the streusel mix.
  • Bake for one hour. To test the cake is ready press  a skewer into the centre of the cake. If it is ready the skewer will come out clean 

So that just leaves me to say thank you for reading and to wish everyone a very happy Christmas

Baking Advent Calendar day 22

During the course of the month I’ve tried to keep a steady mix of sweet and savoury recipes and for the penultimate I’m sharing a bake that has elements of both. It’s a cinnamon and raisin jumble loaf, sweet raisin filled dough with a swirl of cinnamon and brown sugar running through it. The finished loaf is not unlike a pile of your favourite Danish pastries and it’s ideal to tear and share with friends, particularly if accompanied by a pot of good coffee.

The recipe that I shared yesterday initiated with Mary Berry and todays is via Paul Hollywood. The series may be finished for this year but I’m keeping the Great British Bake Off fires burning. If you’ve been with my blog for a while you’ll know that I posted weekly during the recent series and tried to feature a bake each week to fit in with the relevant theme. I got quite a few responses to those posts and enjoyed trying to explain some of the baking peculiarities that people outside of the UK were picking up on. What’s the difference between a sponge and a cake or whats the difference between cookies and biscuits were two of the more common ones. A lot of this stemmed from US TV stations showing the Bake Off and I love that fact that what seems to be such a quintessentially British show is being watched far and wide

As this is one of the more involved recipes that I’ve shared during the advent calendar I thought it better to give you a link to Paul’s original rather than me try and paraphrase it. 

Cinnamon and Raisin Jumble Loaf

The only thing that I do differently from the recipe when I bake is use a round cake tin rather tan the loaf tin that Paul does. I find that this piles the pieces of the loaf in even more of a jumble fashion. Not only does it look good but it makes the tear and share element easier.

If you do have a go at making this don’t worry if it looks slightly over baked on top. It just means that there will be some crunchy pieces pieces to contrast with the soft and gooey ones in the middle.

Baking Advent Calendar day 21

For Baking Advent Calendar day 21 we’re having one of the classics. A Victoria Sponge with cream and strawberries. Unfortunately I didn’t get too many opportunities to bake for my mother but this was always one of her favourites, the picture is of one that I baked for her 80th birthday. Mum didn’t want much fuss made about her birthday and wasn’t keen on letting people know that she’d reached this landmark age. However as our celebratory tea was only going to be with family I felt safe to put the 80 decoration on it.

Sponge is a very light cake made with flour, eggs and sugar. in some recipes it’s leavened with baking powder. It’s thought to be one of the first cakes not to have involved yeast and the first references to it are in a cookbook dating from 1615. The version that we know today dates from the Victorian era and the invention of baking powder in 1843.  I’d always hoped that the name meant it was Queen Victoria’s favourite cake but apparently that not’s that case.

The recipe that I always use is Mary Berry’s and as she’s the Queen of baking that somehow feels quite appropriate.

Ingredients for the sponge

  • 180g unsalted butter, room temperature
  • 180g caster sugar
  • 3 eggs
  • tsp vanilla extract
  • 180g self raising flour
  • 1tbsp warm water

Ingredients for the filling

  • 225g double cream
  • 2.5 tbsp icing sugar
  • 1tsp vanilla extract
  • 200g strawberries

Method

  • Preheat the oven to gas mark 4 and grease two 20cm cakes tins.
  • Beat the butter until it is the consistency of mayonnaise. Then beat in the sugar, just adding a couple of table spoons at a  time.
  • Put the eggs and vanilla into a small bowl and mix with a fork. Then add this to the butter mixture as you beat it. 
  • Sift the flour onto the combined mixture and fold it in. After a couple of folds add the tablespoon of warm water.
  • Divide the batter between the tins and bake for 20 to 25 minutes.
  • After baking leave in the tins for a few minutes before transferring to a rack to cool.
  • When you’re ready assemble whip the cream with the icing sugar and vanilla.
  • Put one cake on a plate, spread with cream and some of the strawberries. Put the other cake on top and finish off with more strawberries and cream.

Baking Advent Calendar day 20

A few days ago I noticed on Twitter that #nationalcookieday was trending, so I posted a picture of some chocolate and pistachios cookies that I’d baked. As they got lots of positive feedback I thought that I’d share them here for Baking Advent Calendar day 20. I often bake these as they keep for up to a week in an airtight container. Ideal if you want to bake a batch at the weekend and then use then in lunchboxes during the week.

If you’ve ever looked at my Twitter feed you’ll know that there’s lots of baking photos on there. I like to share what I’m making and really appreciate the feedback that i get. This started when I first got involved with #twitterbakealong. Every week there is a challenge posted and a whole community of bakers produce and share their own version of whatever task has been set. It’s great fun and if you’re looking for a way of boosting your baking skills and making some like minded contacts I thoroughly recommend it. It doesn’t matter if you’re a complete novice or quite skilled. No one is judgemental and the whole thing is very supportive. 

This recipe produces twelve good size cookies

Ingredients

  • 125g dark chocolate
  • 50g unsalted butter
  • 1 egg
  • 85g light brown soft sugar
  • 30g strong white bread flour
  • 0.25tsp baking powder
  • pinch of salt
  • 100g pistachios, roughly chopped

Method

  • Preheat the oven to gas mark 6 and line a baking tray.
  • Melt the chocolate and butter in a bowl over some simmering water.
  • Whisk the egg and sugar until thick and fluffy.
  • Fold the melted chocolate into the egg mix. Then fold in the flour, baking powder and salt.
  • Put the dough in the fridge for 15 minutes. You want the dough to firm up but not to become too set.
  • Divide the dough into 12 and roll each piece into a ball.
  • Spread the chopped pistachios on a tray and roll the dough balls through them until they are coated.
  • Place the pistachio covered balls on the baking tray. Leave a gap of at least 5cm between them as they will spread as they bake.
  • Bake for 8 to 9 minutes. Remove from the oven and let the cookies cool completely before you remove them from the tray. 
  • Once cooled they will be easy to move but the centre of the cookies will still be quite soft.

Baking Advent Calendar day 19

We’re into the homeward straight now as my Baking Advent Calendar reaches day 19. Today I’m sharing something a little different as we’re having baked berry doughnuts. I suppose that technically I should be calling these doughnut cakes, but as there’s no deep fat fryer in my kitchen  they’re just doughnuts to me.

Doughnuts always conjure up memories of childhood trips to the seaside or fairgrounds. There were always stalls selling these hot, sugar coated treats and equally there was always lots of cajoling of parents to be done before you had any chance of sampling some. 

I’d never thought about baking then at home until I came across a copy Rosie Reynolds book Doughnuts- A Classic Reinvented This book does contain recipes for the more traditional fried versions but it was the sections on baked doughnuts that got me attention. All I needed was a doughnut ring baking tin and I was started.

This recipe makes six. 

Ingredients

  • 85g plain flour
  • 1tsp baking powder
  • 50g ground almonds
  • 2tsp freeze dried berries
  • 75g caster sugar
  • 1 egg, lightly beaten
  • 2tbsp sunflower oil
  • 50g raspberries – mashed with a fork
  • 18 small blueberries

For the topping

  • 50g raspberries mashed with a fork
  • 50g melted white chocolate

Method

  • Preheat the oven to gas mark 4 and grease the doughnut tin.
  • Put the flour, baking powder, ground almonds, freeze dried berries and sugar into a bowl and mix. Put the egg, oil, yoghurt and mashed raspberries into another bowl and mix. Tip the wet mix into the dry and beat until smooth.
  • Put two teaspoons of the mixture into each ring on your doughnut tin. Place three blueberries into each ring and push then just below the surface of the mixture.
  • Bake for 10 to 12 minutes. Leave to cool in the tin for a few minutes then transfer to a wire rack to finish cooling.
  • For the topping push the mashed raspberries through a sieve. Discard the seeds and add a little sugar if you would like the juice sweetened. Drizzle the juice over the doughnuts along with the melted  white chocolate.
Design a site like this with WordPress.com
Get started